
Turn a Mini Notebook into a Second Brain
How to Set Up a Moleskine Notebook for Maximum Productivity
OVERVIEW: You will see how to set up a small notebook as a portable tool for gathering information and keeping yourself organized.

What We are Doing
I am in and out of project meetings all day at work. It is difficult to capture all of the information that is exchanged and keep track of all of my tasks and to-do’s.
When I’m going to meetings I take a regular sized notebook to capture all of my notes. I also keep a mini Moleskine Notebook with me at all times. Why a mini notebook? Well, it fits in my pocket, so I always have it with me. This allows me to do a few things:
- Jot down notes, thoughts, ideas, etc. any time and anywhere
- Keep a master to-do list that spans across all of my projects
- Keep key pieces of “reference” information at hand
I use an elaborate note taking system for my regular sized notebook. Since my mini notebook is, well, mini; I set it up for maximum productivity and efficiency.
Necessary Supplies
You will need the following supplies:
Optional: Fine Tip Pen and Duct tape.
Laying Out Your Notebook
I separate my mini notebook into three distinct sections:
- To-Do – the most important thing is what do I have to do NEXT
- Projects – major projects I’m on
- Reference – small pieces of information that I may need to recall
 To Do
To Do
This is the first section in my book. I just keep a running list of tasks and their due date. Cross them off when their finished. Since I’m only writing the task names in a list, I usually only dedicate 5ish pages to this section.
Reference
This is the last, least frequently used section of my notebook. I keep things like names, phone numbers, website addresses, user names, etc. back there. I only need about 5ish pages for this section too.
Projects
I keep notes, ideas, or hi-level plans about the projects I’m working on in this section. This is the meat in my notebook sandwich. (Even if I am a vegetarian) I use all of the pages that the To-Do and Reference don’t take up. (80 – 90% of the pages) I place different color post-it tabs on each section (like an address book) to clearly separate each one. This helps me navigate very quickly.
The Finishing Touches
You never know when your setup may need to expand to accommodate a productive brainstorm. I add a few extra tricks to the front and back inside covers for those unexpected needs. I get a few teeny, tiny post-it notes and place them in the inside covers. This allows my to write down more information than a page can handle, yet keep it on that page. I also stick a few multi-color post-it tabs in there to use as place holders or flags on particular pages. Typically I use them if there is some outstanding item on a page. I peel them off and recycle them when that item is resolved. Since my notebook is so small, I need a fine tipped pen to write small and legibly. If you want to keep it with your notebook at all times, you can use tape (duct, masking, painter’s, etc.) to rig a pen holder to the cover or spine of your companion. Some may call it ghetto, but I like to call it a “custom modification”. Lastly, I love the little pocket that is in the rear, inside cover of Moleskine notebooks. It is the perfect size to hold a few business cards (yours and theirs), receipts, or other precious scraps.
See How to Set Up your Mini Notebook
The following video shows how I set up my mini notebook for maximum performance and flexibility.
Win the Notebook in this Video
Too cheap or lazy to build your own super-terrific mini notebook? No problem. Leave a comment below for a chance to win the one used in the video demonstration. I will keep the contest open until midnight (EST) Friday, August 6th 2010. Then, I will select a comment at random. I will ship the notebook to the lucky commenter, so that they can be awesome too!

Become an Excel Guru with ASAP Utilities
Use this Super Add-In to Man-handle Excel
OVERVIEW: Learn how to use the ASAP Utilities add-in to dramatically boost the power and ease of using Excel.

What is ASAP Utilites?
I work in an Accounting/Finance area dealing with lots of reporting, so I have Microsoft Excel open all day long. One of the best things that I ever installed on my work machine is ASAP Utilities. This powerful Excel add-in allows you to do complex, advanced tasks quickly and efficiently. It also allows you to do some very handy things that Excel doesn’t even do out of the box.
How Much Does it Cost?
There are two versions: the FREE one which is really for personal use and the $50 version which is for professional use (at work). Aside from the personal/professional rules, they are almost identical.
How Does ASAP Work?
ASAP Utilities installs itself as an Add-In which creates an ASAP Utilities tab on Excel’s ribbon.

All of the operations that ASAP performs are grouped into categories represented by dropdown lists on its ribbon tab.
Some of the features that I used most are under the Sheets, Range, Numbers, Text, and Import categories.
Greatest Hits
Among the numerous features that I use, my favorites are:
Advanced Character Find and Replace – great for removing carriage returns in text.
Copy (formula generated) Data as Values – paste the actual numbers anywhere.
Find and Clear Duplicate Values – great for getting one of each value in a big table.
Color Every Nth Column/Row – get striped rows without making a table.
Delete Leading or Trailing Characters – Strip area codes or middle initials off a list in seconds.
There is even a Favorites option where you can save your most frequently used commands.
These are very useful, but two that I use A LOT are under the Import and Sheets categories. I regularly have to produce a report that pulls data out of 10 – 20 separate Excel files. The data is the same, just for different business groups. I need to get all of this data into one file, then onto one worksheet.
Here’s how I do it:
Us the Merge and/or Import Multiple Files command under the Import category to grab the data from all of my files and pull it into a new workbook. Each file creates a tab named after the original file name.
Opening 15 files, copying their data, and pasting it into a new workbook would take a LOOONG time and be very prone to screw-ups.
Now that I have all of the data in separate tabs in the same workbook, I need to get all of the data onto the same worksheet. I select all of the worksheets (tabs) and run the Put together rows/columns from separate sheets command under the Sheets category. This places a copy of all of the data on my 15 tabs into a brand new tab. Voila! Now I can sort, subtotal, and analyze everything at once. This takes me about three minutes depending on the number and size of the files. Try doing that as a copy and paste job in less than 20!
See it in Action
The following video shows how to combine data from 15 separate Excel files into one worksheet in a new file.
Some Other Weird but Cool Options
There are more commands/features than I care to count. Most people will probably stick to a few core features, but here are a few obscure ones that I like:
Bulk Create Folders – type a bunch of folder names in cells and it will create them on your hard drive.
Text Case – Convert hundreds of rows of text to UPPERCASE, lowercase, or Title Case.
List All Fonts in a New Workbook – List every font on your machine and display every character in that font. Pretty handy for typesetting.
Find and Remove All Links – Strips html links from data that you pasted from the internet.
What are you Waiting For, Go Get It
Head on over to http://asap-utilities to get yourself a FREE copy of ASAP Utilities. You will be the new Excel Guru in your office.
Did you Like this Article?
Why not get free updates from VitaminCM.com?
 Subscribe via RSS Reader
 Subscribe via YouTube
Or just  Follow me on Twitter, where I am constantly sharing great articles written by people WAY smarter than me. Or, see some of the other places where you can connect with me out there in the wilds of the internets.
85 Free Apps that will Save you Thousands of Dollars
Save Tons of Cash with the Best Free Software OVERVIEW: You can replace the most expensive applications on a typical computer with excellent, free software and internet services and never miss a beat. Why Pay More? Equipping your computer with the software that you need to get everything done can be insanely expensive. However, you […]

Create a Portable Document Scanner for your iPhone
Getting All of those Scraps into your Computer
Overview: You will learn how to turn your iphone into a portable document scanner for free in under 15 minutes. This will all be done using one piece of cardboard, a ruler, a utility knife and a pencil.
Getting Things Done With Creativity and Elbow Grease
Occasionally I need to get digital copies of papers into my home and/or work computers. I don’t feel like having two full-blown scanners wasting space on my desks, nor do I feel like buying them.
What’s my quick, free, space saving solution? Build a stand that allows me to use my iPhone to make quick images of documents.
I have a few simple requirements for this document scanner:
- Must be able to be assembled quickly and easily
- Muse capture 8.5″ x 11″ documents perfectly (no cropping)
- Must be able to be disassembled, and stored quickly and easily
- Must be cheap (better yet, FREE!)
I searched for a few alternatives and found this really cool option by Kyle Koch.
He sells them for $15 here. This is an awesome idea and $15 is very fair price. But what fun would that be? I decided to try to build my own for free.
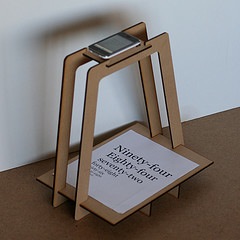
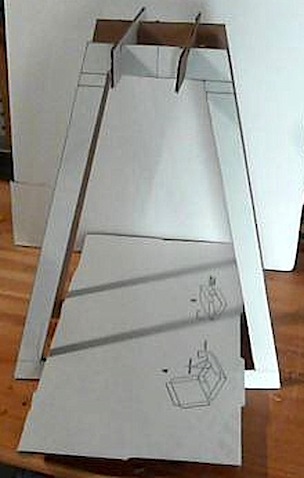
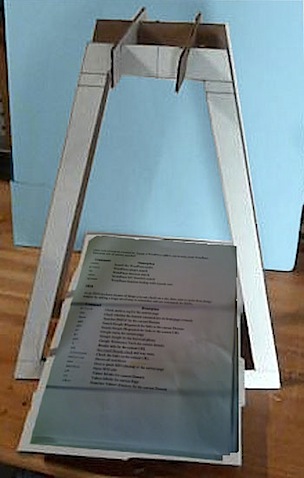
This is my finished prototype:
I place the document on the tray and the phone on the top supports with the camera application running. Then, I just press the “shoot” button and have a decent scan of the document. The key is to have the USB cable plugged in so that you can just grab them using the computer’s file manager. Also, the better the lighting, the happier you’ll be.
With a little bit of practice, I was able to get acceptable results on each documents first try.
Here are some of the document scans that I produced: (scaled down for this article)
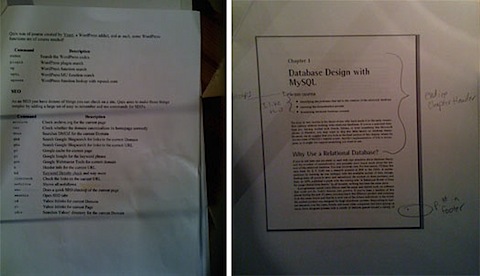
Not bad for $0 and 20 minutes time.
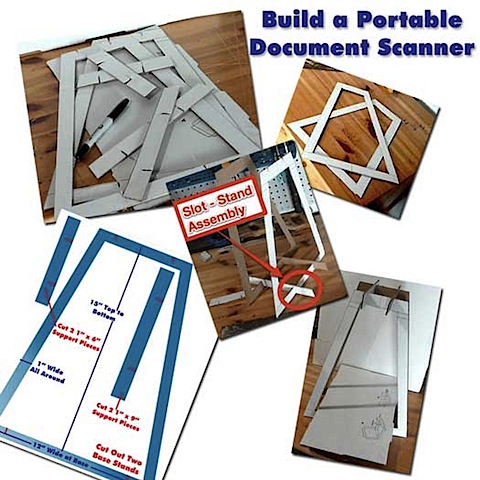
Instructions for Building your iPhone Document Scanner
I know, you want to build yourself one of these handy gadgets, right? Well believe me, it’s very simple.
What you Will Need
Supplies: Utility Knife , Pencil, Ruler or Yardstick
, piece of cardboard (15″ X 30″), scissor.
Instructions:
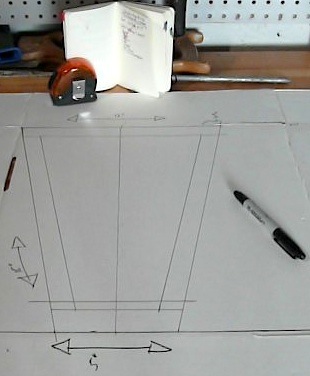
Print out and assemble the Templates diagram
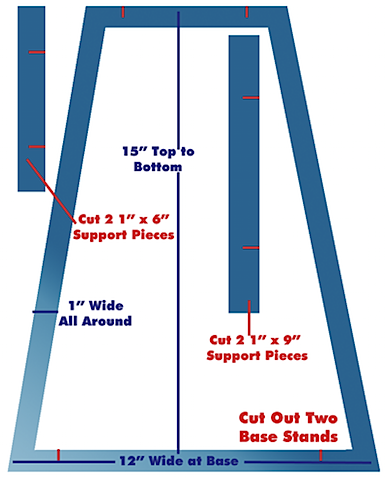
Trace two Stand pieces on the cardboard
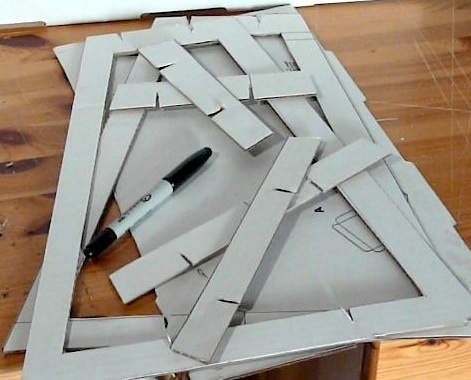
Cut out the Stand pieces using the Yardstick and Utility Knife (be very careful)

Trace and cut out the two Bottom Brackets
Trace and cut out the two Top Brackets
Cut the notches into the Stands and Braces as shown on the diagram
Insert the notches on top and bottom to assemble the Stand
Place the rectangular base into the stand

Place a document on the rectangular base
Turn the phone’s camera application on and place it on the top braces so that the document is in the picture
Take the picture.
Portable Document Scanner Video Tutorial
The following video tutorial shows you how to perform all of the steps necessary to make your scanner.
Subscribe to VitaminCM.com for Free
Get free updates from VitaminCM.com
Get the VitaminCM.com Podcast
 Subscribe via iTunes
 Friend me on StumbleUpon
 Friend me on Facebook
 Friend me on Digg.com
 Share bookmarks on Delicious
 Share music with me on Last.FM
 Share pictures on Flickr
Improve your Internet Reading Experience Using Instaper
From Clutter to Clean in One Click
Overview: You will learn how to use Instapaper.com’s service to quickly clean, reformat, and save articles on the web to a convenient location for you to read later.
What is Instapaper?
When you are on the internet, you probably find important, interesting, or useful information. The problem is that just don’t have time to read it at that moment. With just one click, Instapaper reads, cleans, and stores the information for you to read at your convenience.
Allows you to easily save information from the web into a central location to be read later on in a clean, simple format.
Advantages of Using Instapaper
Here are some of the main advantages to using Instapaper:
- Clean formatting for efficient reading experience (plain text and simple images)
- Stores the URLs to the source material
- Easily share your saved material
- Great third party integration
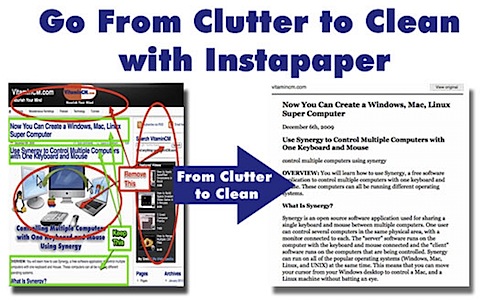
When you have a busy page (like the one below) that may have Headers, Footer, Sidebars, Ads, lot’s of media, and other distractions. It is not the optimum reading experience. This can be exacerbated by being on a mobile device or in a hurry.
Just click the Read Later bookmarklet and save a copy for later reading.
This is what the Instapaper version looks like. A little easier to read, don’t you think?
If you want to see the original page, just click the View Original button at the top of the page.
See How it Works
Here is the whole process:
- Create an account at Instapaper.com
- Add the Instapaper bookmarklet to our browser’s toolbar (Learn all about bookmarklets)
- Enter your Instapaper credentials
- Click the bookmarklet when you find a page that you want to read later
- Go to Instapaper and read your stuff
See Instapaper in Action in the Video Tutorial Below
Where you can Use Instapaper
You can use the Read Later bookmarklet in any desktop or mobile browser that supports bookmarks.
Many Twitter clients for iPhone have it built right in.
RSS Readers like Google Reader and some desktop readers.
See the full list of places where you can use Instapaper on their website.
Instapaper Alternatives
There are a few other services that offer similar features out there.
ReaditLater uses a Firefox plugin to save pages to a location where they can be read at your leisure. They have an iPhone app too.
Readability is another tool that works through a bookmarklet to strip out distractions and give you a cleanly formatted page to read.
For the old school types out there, you can try the PrintWhatYouLIke bookmarklet and send a stripped down, clean page to your printer that you can read later.
Subscribe to VitaminCM.com for Free
Get free updates from VitaminCM.com