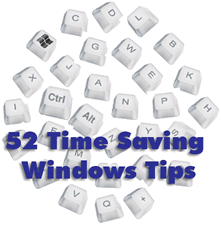
52 Time Saving Windows Tips
If you want to work faster and more efficiently on your PC you really need to leverage the shortcut keys that
If you want to make Windows a super-efficient productivity machine, you really need to make use of it’s built in shortcuts. Learning just a few simple keystrokes can help you get everything done quicker and easier than you may imagine. Here is a list compilation of over 50 shortcuts, tips, commands, and more that will dramatically improve your computing experience.
The Control Key
![]()
![]()
The Control key is your most powerful ally. Ctrl + some keys will allow you to quickly perform the most important, useful operations on your computer.
CTRL + A = Select All
CTRL + B = Bold selected content
CTRL + C = Copy selected content
CTRL + V = Paste copied content
CTRL + X = Cut selected content
CTRL + P = Print
CTRL + N = Create a New File
CTRL + S = Save
CTRL + Z = Edit> Undo
CTRL + I = Italicize selected content
CTRL + E = Center selected content (only some apps)
CTRL + Q = Quit active program
CTRL + U = Underline selected content
CTRL + O = Open a file in the active application
CTRL + R = Refresh browser
CTRL + G = Group selected items into one
CTRL + T = Open a new Browser tab
CTRL + HOME = Top of a document or page
CTRL + END = Bottom of a document or page
CTRL + SHIFT + ESCAPE = Open Task Manager
CTRL + SHIFT + S = Save As
The Windows Key

![]()
The Windows or Start key does some very useful tricks.
 + E = Opens Windows Exporer
+ D = Minimize or Restore all open application windows
+ L = Locks your computer (Same as Ctrl + Alt + Del, then Lock button)
+ R = Open Run command
+ F = Search Files on computer
+ U = Open Utility Manager
+ F1 = Help Menu
The Alt Key
![]()
![]()
The Alt key is infrequently used, but it has a few gems up its sleeve.
ALT + TAB = Toggle between running applications
ALT + “any letter” = Show quick tasks in menus and toolbars (ALT + F opens the File Menu)
The Function Keys
F1 = Help Menu
F2 = Rename File / Folder
F4 = Repeat last formatting option in Office
F5 = Refresh Browser
F11 = Hide/Restore Browser toolbars
F12 = Print
Windows Explorer Tips
Make shortcuts to your frequently used folders and files
Place shortcuts to your frequently used folders in the Favorites folder (C> Windows>Favorites)
Quickly jump to your favorite
Drag files from Explorer to a document, email, etc.
Drag file attachments from an email or browser to a folder in Explorer
Keep two Explorer Windows open and drag and drop files between folders
Microsoft Office
F4 = Apply the last formatting command
CTRL + Z = Undo last action
CTRL + Y = Redo the action that was Undone
Right click on text to show formatting options. (Office 2007 & 2010)
Internet and Browser Shortcuts
These shortcuts will work in any browser on Windows.
Backspace = Go to the previous page
ALT + ![]() = Go to the previous page
= Go to the previous page
ALT + ![]() = Go Forward a page
= Go Forward a page
F5 Key = Refresh Browser
CTRL + R = Refresh Browser
CTRL + T = Open a new Browser tab
CTRL + Click a link = Open link in a new tab
SHIFT + Click a link = Open link in new Browser window
F11 = Hide/Restore Browser toolbars/menus
Right Click to copy or save an image
Scroll Wheel Click on a link to open it in another tab
Scroll Wheel Click on a tab to close the tab
Drag a tab out of the window to open that tab in its own window
Drag a tab from one browser to another to open the page in a different Browser
Right Click Options
Right Click ![]()
If you are in ANY application and are looking for a quick way to get something done, try the Right Click trick. Right clicking usually opens up a menu with several convenient options in most software. This is a lifesaver lots of times.
When in doubt, Right Click!
More Resources
Here are a few great places to find even more handy tips.
How to navigate Windows using a keyboard
Save time with quick computer shortcuts
Mac Keyboard Shortcuts
If you’re using a Mac, there is a similar collection of incredibly useful shortcuts to help you out. Try some of these.
Reference for EVERY Character Key on a Mac
Did you Like this Article?
Why not get free updates from VitaminCM.com?
 Subscribe via RSS Reader
 Subscribe via YouTube
Or just  Follow me on Twitter, where I am constantly sharing great articles written by people WAY smarter than me. Or, see some of the other places where you can connect with me out there in the wilds of the internets.

How to Set Up a Dual Monitor Desktop – Windows
Add More Screen Real Estate to Get More Done
Overview: See how to boost your productivity by setting up a two monitor desktop on your Windows computer.
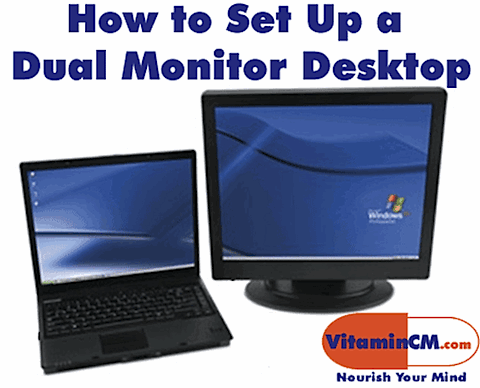
If you have a laptop, or a desktop with a dual-port video card, you can stretch your desktop across two monitors. This is an extremely easy way to boost your productivity when working with multiple documents and applications.
Frequently, you need to constantly jump back and forth between multiple windows on your computer. This becomes confusing, because one of the windows is always hidden behind the other. When you need to make comparisons or analysis, it is easy to miss small details.
Why not have two monitors and view both windows side-by-side at the same time, like you would do if you were comparing two printed documents.
This is a very quick and easy process.
What you will need:
- One external monitor
- One laptop or desktop computer
- Two minutes
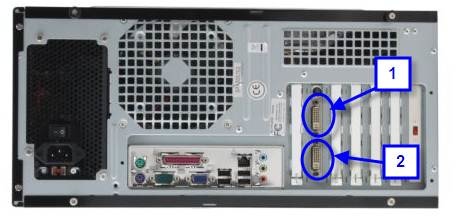
Optional: If you have a desktop, you can still do this. You will need to get two external monitors and make sure that you have a dual-port video card. The diagram below shows what a dual-port video card will look like on your computer.
Setting up the Hardware
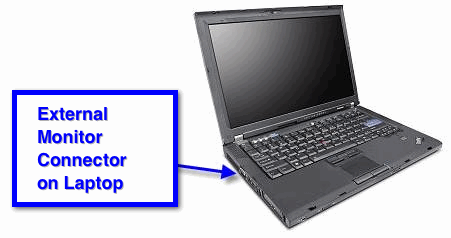
Start by plugging the external monitor into your laptop’s monitor port.
Turn on your computer and log in.
Configuring Your Settings
Minimize any software that you have open until you see your desktop.
Right click on your desktop to open an options menu.
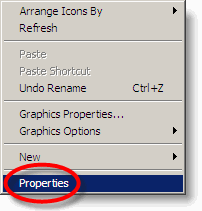
Select Properties from the options menu.
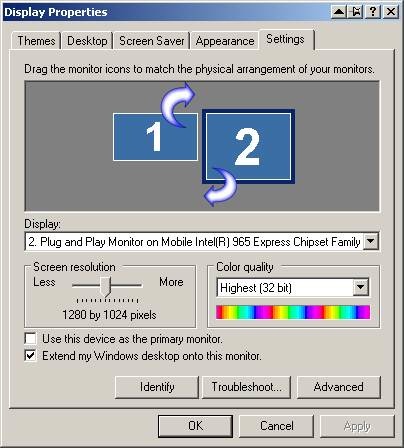
The Display Properties menu will open.
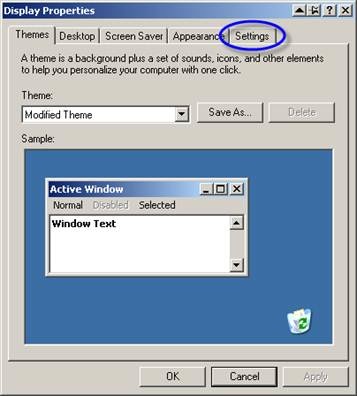
There are five tabs on this menu. Click the Settings tab.
The settings tab will allow you to control how the monitor(s) on your system work.
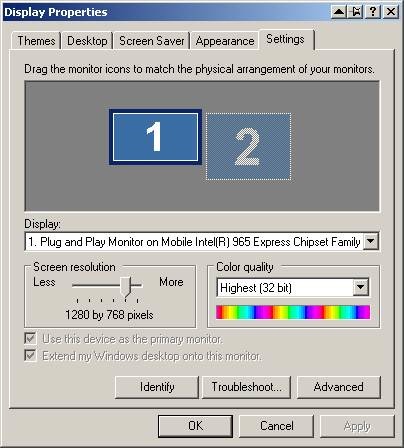
If you have the external monitors hooked up, you will see two boxes in the top portion of the menu. (Numbers 1 and 2 represent your two monitors.)
By default, they will both have the same exact information. This is so that if you ever hook up a projector, you and the audience will see the same thing.
Spilt the Two Monitors
Now, you want to make the second (external) monitor act independently of the laptop’s monitor.
Click on the “2” icon to view and edit the second monitor’s settings.
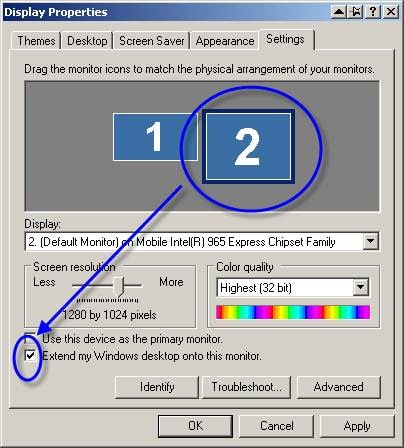
The last checkbox at the bottom of the screen will allow you to split the monitors in two. Check the Extend my Windows desktop onto this monitor checkbox.
Do not close the Display Properties menu yet.
Arrangingthe Montitors to Match their Physical Locations
Depending on how you have your laptop and monitor positioned on your desk, you may need to adjust the arrangement on screen.
By default, the laptop’s monitor (1) will be to the left of the external monitor (2). If you don’t have your desk set up this way, you will need to click and drag them to match your setup.
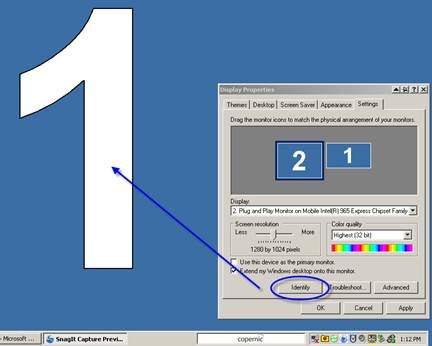
Identifying your Physical Montiors
You can always see which monitor is which by clicking the Identify button at the bottom of the Display Properties menu.
A giant number 1 and 2 will appear on each monitor for identification purposes.
Moving Applications Between Monitors
Now that you have both of your monitors set up and working properly, you can separate windows into whichever one is most convenient.
You cannot move a window if it is maximized on one monitor. You will need to “un-maximize” the window before it can be moved.
Click the ![]() button to un-maximize the window.
button to un-maximize the window.

Click on the Title Bar at the top of the window and drag it from one monitor to the other.
Click and drag the bottom corner of the window to resize it, or just click the maximize button to re-maximize the window.
Final Step:
Sit back and bask in the glory of your super-terrific multi-monitor wonderland.
See How it’s Done in this Video Tutorial
The following video tutorial shows you how to set up a two monitor desktop on a windows computer.
Did you Like this Article?
Why not get free updates from VitaminCM.com?
Or just Follow me on Twitter, where I am constantly sharing great articles written by people WAY smarter than me. Or, see some of the other places where you can connect with me out there in the wilds of the internets.

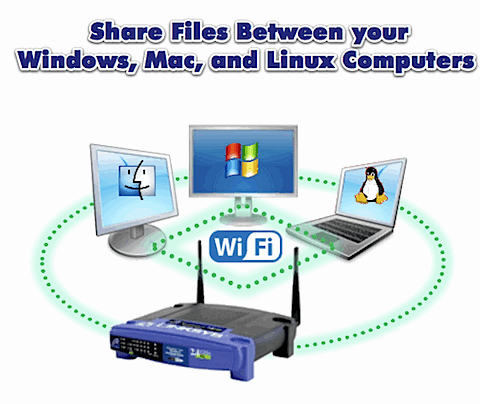
Share Files Between All of your Computers
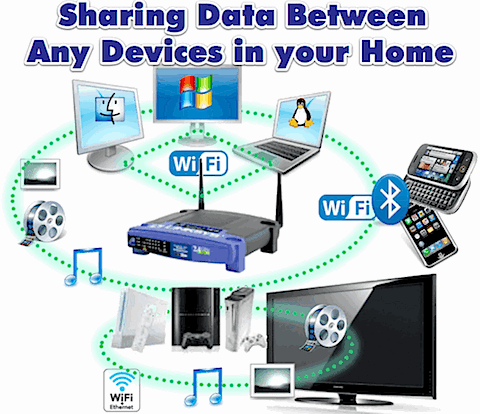
Sharing Files Between Any Devices in your Home
OVERVIEW: You will learn how to share folders and file on your Windows, Macintosh, and Linux computers on your home netork.
This is the first article in a three part series on Sharing Files Between Any Devices in your Home.
- Part 1 – Share Files Between All of your Computers
- Part 2 – Stream Computer Media to the TV using Video Game Consoles
- Part 3 – Sharing Between your Smartphone and Computer
You Can Get there from Here
Your home has any number of “connected” devices (Computers, Video Game Consoles, Phones, Portable Media Players, Televisionss, DVRs, etc.). Are they all really connected? Here are some simple (and not so simple) steps to get all of your devices singing in harmony.
Sharing Files on your Computers
If you’re like me, the bulk of your media and files sit on one or more computers. You may even have more than one Operating System to further complicate the business of sharing information. Here is how you can share your files between computers runing Windows, Mac, and Linux.
NOTE: This article only addresses sharing files between devices INSIDE of your home network. While connecting to devices on your home network from the outside world (internet) is possible, it will not be covered here.
Sharing the Files on your Computers
IMPORTANT: The following set of instructions shows how to share ALL of the files on your computer. This is not the most secure approach to sharing. You should determine which folders you want to share (for example My Documents or My Music) and perform the following steps at that level.
Sharing Files on a Windows Computer
Windows allows you to share an entire hard drive or select specific folder to share. You can choose the drive or folder to share from Windows Explorer.
Open Windows Explorer (Windows Key + E)
You will see all of your computer’s drives (C, D, etc.)
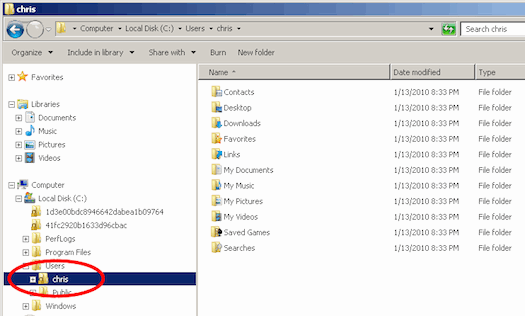
Browse to the entire drive or specific folder that you would like to share.
Right click on the folder that you want to share and select Properties from the options menu.
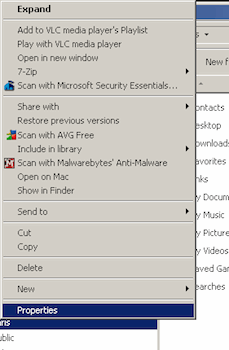
The Properties menu will open.
Go to the Sharing tab
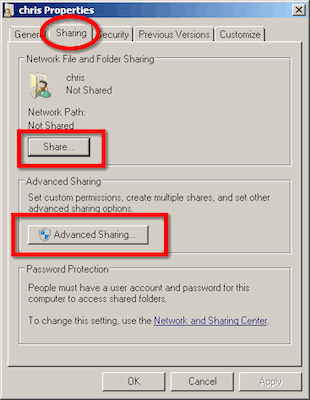
Check the Share button.
Optional: You can also apply finer controls to the sharing priviledges from the Advanced Sharing menu.
Click the OK button to close the Properties menu.
Now, users on your network will be able to access the files on this compter.
Sharing Files on a Mac Computer
You can also share folders with other computers on your Mac computer. You need to go to the System Preferences menu to configure sharing (Applications> System Preferences).
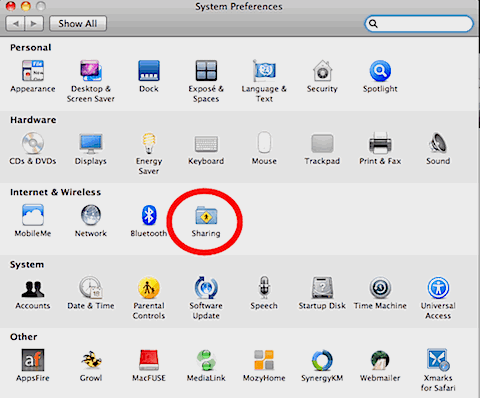
The preferences are grouped by topic on this menu. Click the Sharing icon under the Internet & Wireless heading.
This will open the Sharing panel.
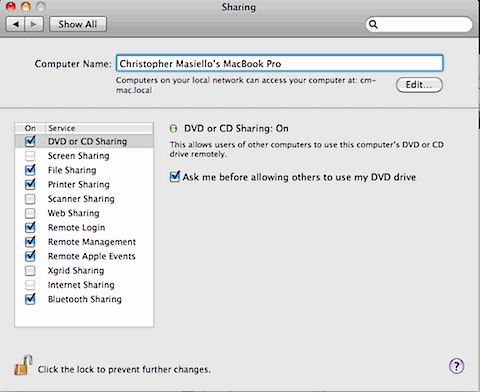
You can share several of your Mac’s resources from here.
Check the resources that you want to share and close this menu.
Now, other computers on your network will be able to this compter.
Sharing Files on a Linux Computer
One of the best and easiest ways to share folders between Linux computers and machines running Windows is using Samba. Samba is a suite of applications for Linux that provides connectivity between Linux and Windows machines. This will allow a Windows machine to interact with it just like another PC.
NOTE: This example uses Ubuntu Linux. If you use a different distro, just Google for the specific instructions.
Start out by installing Samba on your Linux machine. Go to the terminal and type the following command:
sudo apt-get install samba smbfs
Samba is installed now, but you need to configure it so that it is accessible. Run the following command to open Samba’s configuration file (smb.conf):
sudo gedit /etc/samba/smb.conf
Scroll down to this section in the file:
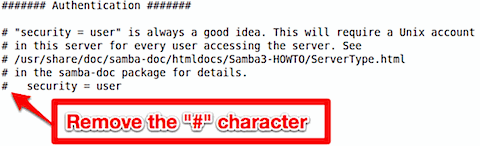
Uncomment the security line (delete the number sign), and add the following line below it, so that it look like this:
security = user
username map = /etc/samba/smbusers
Now, Samba will use the smbusers file to look up the user list.
You need to creat a user that can access the Samba server.
There are two steps to creating a user.
Run the smbpasswd utility to create a samba password for the user. Type the following command (substitute a real user name for “username”):
sudo smbpasswd -a <username>
Next, open up the smbusers file and add that username. Type the followng command:
sudo gedit /etc/samba/smbusers
When the smb users file opens, add the following line, (substitute a real user name for “username”).
<username> = “<username>”
The format is <ubuntuusername> = “<samba username>”.
Telling Samba to Share a Linux Directory
Now you can create Samba shares and give access to the user(s) that you create here.
Reopen Samba’s configuration file (smb.conf) by typing the following command:
sudo gedit /etc/samba/smb.conf
Scroll down to the Share Definitions section of the file, and make it match the following:
#======================= Share Definitions =======
# Un-comment the following (and tweak the other settings below to suit)
# to enable the default home directory shares. This will share each
# user’s home directory as \server\username
[homes]
comment = Home Directories
browseable = yes
# By default, \server\username shares can be connected to by anyone
# with access to the samba server. Un-comment the following parameter
# to make sure that only “username” can connect to \server\username
valid users = %S
# By default, the home directories are exported read-only. Change next
# parameter to ‘yes’ if you want to be able to write to them.
writable = yes
Now Windows machines/users will be able to map a drive on windows using the following share format:
\ubuntumachinename\username
For example, if the Ubuntu machine is named linuxshare, and the username is chris, your share path would be \linuxshare\chris
Connnecting to a Shared Computer
Now that you have the files on all of your machines shared, you need to connect to them from another machine. You can even “map” these shared drives permanently so that they are always available, just like your computer’s Hard Drive or CD/DVD Drive.
Connecting to a Shared Computer from a Windows Computer
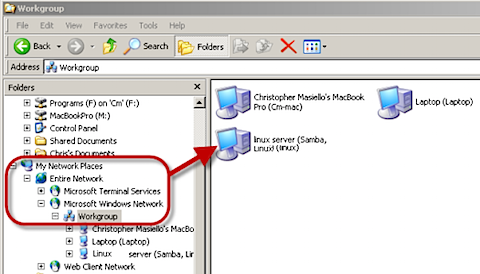
You can locate shared computers on your network from the My Network Places section of Windows Explorer.
Open Windows Explorer (Windows Key + E)
Click the “+” icon to the left of My Network Places in the folders panel. (View> Explorer Bar> Folders)
Click the “+” icon to the left of Entire Network
Click the “+” icon to the left of Microsoft Windows Network
Look for the name of the shared computer/drive Drill down on that compter as if it were a folder on your computer.
Permanently Mapping to a Shared Drive in Windows
If you want to Window Explorer to remember this shared folder and give it a drive letter (like your C or D drives) you need to “Map” it.
Select Tools> Map Network Drive
Select a letter for this share from the Drive dropdown list
Click the Browse button to the right of the Folder dropdown list
Use the steps above to locate the shared drive/folder that you want to map
Check the Reconnect at Logon box (this will remember the letter/drive mapping)
Click the Finish button
Now, the next time you start the computer the shared folder will appear just like your local hard drive or CD drive with the letter you assigned.
Connecting to a Shared Computer from a Mac Computer
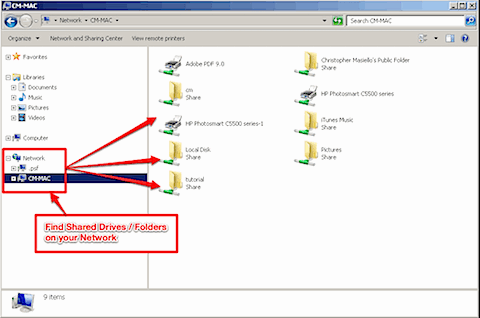
You can locate shared folders on other computers on your network using the Finder application on your Mac. (Applications> Finder)
Click on your Mac, so that you can see the local drives and the Network icon.
You will see any computers that have shared drives/folders on your network.
Click on the shared machine to access its files.
Permanently Mapping to a Shared Drive in Mac
If you want Finder to remember this shared folder just like the ones on your local machine you need to “Add it to the Sidebar”.
Browse to the shared folder and click File> Add To Sidebar.
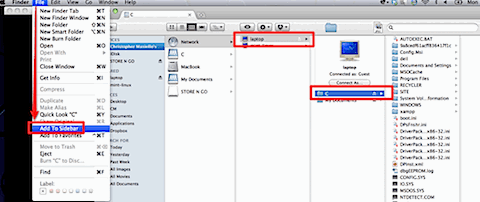
Now it will show up under the Places heading on Finder’s sidebar.
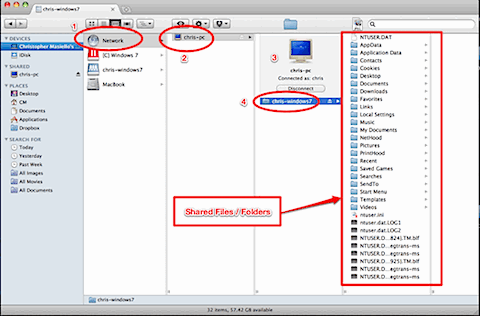
Connecting to a Shared Computer from a Linux Computer
You can locate shared folders on other computers on your network using one of the many file manager applications available in Linux.
NOTE: This example uses Dolphin to navigate Linux’s file system.
Open Dolphin and click the Network icon in the Places panel.
You will see a list of ways to access your Network and the shared folders located on its machines.
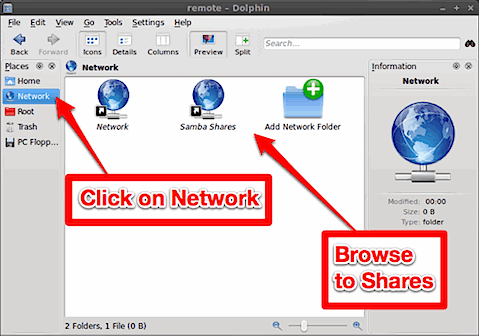
Click Network to locate Linux and Mac machines. Click Samba Shares to locate Windows machines.
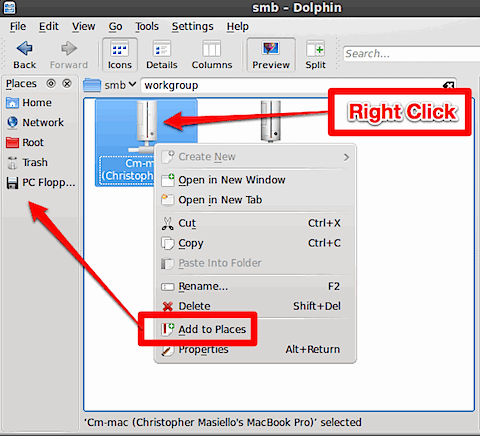
Permanently Mapping to a Shared Drive in Linux
If you want Linux to remember this shared folder just like the ones on your local machine you need to “Add it to the Sidebar”.
Browse to the shared folder and click File> Add To Sidebar.
Video Tutorial – See it in Action
See how to perform each of the steps listed above in this video tutorial
Wanna make sure that you don’t miss anything?
Get free updates from VitaminCM.com
Or just Follow me on Twitter, where I am constantly sharing great articles written by people WAY smarter than me. Or, see some of the other places where you can connect with me out there in the wilds of the internets.

Share Files Between Any Devices in your Home
Learn How to Tie All of your Gadgets Together
You Can Get there from Here
Your home has any number of “connected” devices (Computers, Video Game Consoles, Phones, Portable Media Players, Televisions, DVRs, etc.). Are they all really connected? This three part tutorial series will show you how to connect all of the devices in your house to each other.
I will show you some simple (and some not so simple) steps to get all of your devices singing in perfect harmony including:
- Part 1 – Share Files Between All of your Computers
- Part 2 – Stream Computer Media to the TV using Video Game Consoles
- Part 3 – Sharing Between your Smartphone and Computer
Sharing Files on your Computers
You will learn how to share your files between Windows, Mac, and Linux computers on your home network. Once you have the files on all of your machines shared, you need to connect to them from another machine. You will also learn how to “map” these shared drives so that they are always available, just like your computer’s local Hard Drive or CD/DVD Drive. Share Files Between All of your Computers
Connecting your Computer to your Living Room
You will learn how to stream all of the music, photos, and videos on your computers to your living room using your video game console. There are instructions for Microsoft Xbox 360, Sony PlayStation 3, and Nintendo Wii. You will see how to connect WIndows, Mac, and Linux machines to all three gaming systems. Stream Computer Media to the TV using Video Game Consoles
Connecting your Smartphone to your Computer
You will learn how to stream music, photos, and videos from your computer to your smartphone. You will also learn how to use your smartphone to control your computers and schedule recordings on your DVR. Sharing Between your Smartphone and Computer
5min.com Video of the Day
Wanna make sure that you don’t miss anything?
Get free updates from VitaminCM.com
Or just Follow me on Twitter, where I am constantly sharing great articles written by people WAY smarter than me. Or, see some of the other places where you can connect with me out there in the wilds of the internets.

Bring Excel Data to Life with Conditional Formatting
Learn how to use Microsoft Excel 2007’s advanced conditional formatting features to take your boring data and make it tell a more interesting story.