
Sync Files on Multiple Computers Using DropBox – Video Tutorial
Learn how to keep your files in sync across multiple computers with this Dropbox Tutorial.

How to Create a Bulk Software Installer
You will learn how to install dozens of awesome, free applications on your computer in 5 simple steps. No money, 200 Point IQ, or Back-Breaking Labor required!

Save Tons of Time Using Automator for Mac – Video Tutorial
Learn how to create sophisticated workflows using the Macintosh Automator tool in this step-by-step video tutorial.
Customize your Browsers with the Quix Super Bookmarklet
Create the Ultimate Command Line for your Browser
Overview: You will learn how to use Quix browser bookmarklet to Make a Super Bookmarklet for your browser.
What is Quix?
Quix is an exensible bookmarklet tool that performs the functions of several bookmarklets, extensions, and GreaseMonkey scripts.
What’s in it for You?
You can remove several extensions, GreaseMonkey scripts, and existing bookmarklets. This will get rid of some browser bloat (caused by extensions) and speed things up. It will also clean up your browser’s interface a little. Plus, you can add a lot of power and flexibility to your browser using Quix.
Removing Unnecessary Extensions
Before I added the Quix Bookmarklet to FireFox, I was running the following extensions: Ubiquity, Evernote Clipper, Delicious (among others).
I was able to uninstall them completely. This took two buttons off my toolbar and cut back on some ram. Not all of the big five browsers use extensions, but most support them in some form, so this will have a similar effect there too.
Removing Unnecessary Greasemonkey Scripts
One of the most handy FireFox extensions is Greasemonkey. Greasemonkey allows you to customize the way a webpage works using small bits of JavaScript. There are thousands of Greasemonkey scripts available that help you get more from just about any popular website or service. While these may be incredibly useful, they do come at a small cost.
I was able to remove a few Greasemonkey scripts that I no longer needed.
Combining Several Bookmarklets into One Button
Bookmarklets don’t place any processing load on your browser when they are not being used, but they do take up space on your toolbar. I was able to remove the following highlighted bookmarklets from my toolbar and replace them with functions in Quix.
How to use Quix
Just go to Quixapp.com and drag the Quix bookmarklet to your Bookmarks toolbar
Click the Quix bookmarklet and type a short command (1 – 10 letters).
The command above (bd) will bookmark the current page to your Delicious account.
Your browser performs a helpful task for you.
Here is a full list of Quix commands and what they do.
If you have some coding skills and like getting your hands dirty, you can even create you own custom commands.
Quix Bookmarklet Video Tutorial
The following video shows how to install, configure and use Quix to make your browser more powerful.
Subscribe to VitaminCM.com for Free
Get free updates from VitaminCM.com
 Subscribe via RSS Reader
Get the VitaminCM.com Podcast
 Subscribe via iTunes
 Subscribe via YouTube
 Follow me on Twitter
 Friend me on StumbleUpon
 Friend me on Facebook
 Friend me on Digg.com
 Share bookmarks on Delicious
 Share music with me on Last.FM
 Share pictures on Flickr
Improve your Internet Reading Experience Using Instaper
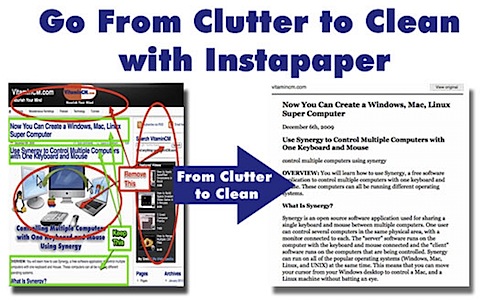
From Clutter to Clean in One Click
Overview: You will learn how to use Instapaper.com’s service to quickly clean, reformat, and save articles on the web to a convenient location for you to read later.
What is Instapaper?
When you are on the internet, you probably find important, interesting, or useful information. The problem is that just don’t have time to read it at that moment. With just one click, Instapaper reads, cleans, and stores the information for you to read at your convenience.
Allows you to easily save information from the web into a central location to be read later on in a clean, simple format.
Advantages of Using Instapaper
Here are some of the main advantages to using Instapaper:
- Clean formatting for efficient reading experience (plain text and simple images)
- Stores the URLs to the source material
- Easily share your saved material
- Great third party integration
When you have a busy page (like the one below) that may have Headers, Footer, Sidebars, Ads, lot’s of media, and other distractions. It is not the optimum reading experience. This can be exacerbated by being on a mobile device or in a hurry.
Just click the Read Later bookmarklet and save a copy for later reading.
This is what the Instapaper version looks like. A little easier to read, don’t you think?
If you want to see the original page, just click the View Original button at the top of the page.
See How it Works
Here is the whole process:
- Create an account at Instapaper.com
- Add the Instapaper bookmarklet to our browser’s toolbar (Learn all about bookmarklets)
- Enter your Instapaper credentials
- Click the bookmarklet when you find a page that you want to read later
- Go to Instapaper and read your stuff
See Instapaper in Action in the Video Tutorial Below
Where you can Use Instapaper
You can use the Read Later bookmarklet in any desktop or mobile browser that supports bookmarks.
Many Twitter clients for iPhone have it built right in.
RSS Readers like Google Reader and some desktop readers.
See the full list of places where you can use Instapaper on their website.
Instapaper Alternatives
There are a few other services that offer similar features out there.
ReaditLater uses a Firefox plugin to save pages to a location where they can be read at your leisure. They have an iPhone app too.
Readability is another tool that works through a bookmarklet to strip out distractions and give you a cleanly formatted page to read.
For the old school types out there, you can try the PrintWhatYouLIke bookmarklet and send a stripped down, clean page to your printer that you can read later.
Subscribe to VitaminCM.com for Free
Get free updates from VitaminCM.com