27 Pages of Windows and Office Productivity Tips
I put together a handout that showed how to do all of the tips that I was demonstrating. Everybody seemed to like it and find it helpful. I cleaned it up and made it into a PDF file that you can print out.
Turn a Mini Notebook into a Second Brain
How to Set Up a Moleskine Notebook for Maximum Productivity
OVERVIEW: You will see how to set up a small notebook as a portable tool for gathering information and keeping yourself organized.

What We are Doing
I am in and out of project meetings all day at work. It is difficult to capture all of the information that is exchanged and keep track of all of my tasks and to-do’s.
When I’m going to meetings I take a regular sized notebook to capture all of my notes. I also keep a mini Moleskine Notebook with me at all times. Why a mini notebook? Well, it fits in my pocket, so I always have it with me. This allows me to do a few things:
- Jot down notes, thoughts, ideas, etc. any time and anywhere
- Keep a master to-do list that spans across all of my projects
- Keep key pieces of “reference” information at hand
I use an elaborate note taking system for my regular sized notebook. Since my mini notebook is, well, mini; I set it up for maximum productivity and efficiency.
Necessary Supplies
You will need the following supplies:
Optional: Fine Tip Pen and Duct tape.
Laying Out Your Notebook
I separate my mini notebook into three distinct sections:
- To-Do – the most important thing is what do I have to do NEXT
- Projects – major projects I’m on
- Reference – small pieces of information that I may need to recall
 To Do
To Do
This is the first section in my book. I just keep a running list of tasks and their due date. Cross them off when their finished. Since I’m only writing the task names in a list, I usually only dedicate 5ish pages to this section.
Reference
This is the last, least frequently used section of my notebook. I keep things like names, phone numbers, website addresses, user names, etc. back there. I only need about 5ish pages for this section too.
Projects
I keep notes, ideas, or hi-level plans about the projects I’m working on in this section. This is the meat in my notebook sandwich. (Even if I am a vegetarian) I use all of the pages that the To-Do and Reference don’t take up. (80 – 90% of the pages) I place different color post-it tabs on each section (like an address book) to clearly separate each one. This helps me navigate very quickly.
The Finishing Touches
You never know when your setup may need to expand to accommodate a productive brainstorm. I add a few extra tricks to the front and back inside covers for those unexpected needs. I get a few teeny, tiny post-it notes and place them in the inside covers. This allows my to write down more information than a page can handle, yet keep it on that page. I also stick a few multi-color post-it tabs in there to use as place holders or flags on particular pages. Typically I use them if there is some outstanding item on a page. I peel them off and recycle them when that item is resolved. Since my notebook is so small, I need a fine tipped pen to write small and legibly. If you want to keep it with your notebook at all times, you can use tape (duct, masking, painter’s, etc.) to rig a pen holder to the cover or spine of your companion. Some may call it ghetto, but I like to call it a “custom modification”. Lastly, I love the little pocket that is in the rear, inside cover of Moleskine notebooks. It is the perfect size to hold a few business cards (yours and theirs), receipts, or other precious scraps.
See How to Set Up your Mini Notebook
The following video shows how I set up my mini notebook for maximum performance and flexibility.
Win the Notebook in this Video
Too cheap or lazy to build your own super-terrific mini notebook? No problem. Leave a comment below for a chance to win the one used in the video demonstration. I will keep the contest open until midnight (EST) Friday, August 6th 2010. Then, I will select a comment at random. I will ship the notebook to the lucky commenter, so that they can be awesome too!
How to Create a Dropdown List in Excel
Learn how to create a dropdown list that populates cells in Microsoft Excel.
Become an Excel Guru with ASAP Utilities
Use this Super Add-In to Man-handle Excel
OVERVIEW: Learn how to use the ASAP Utilities add-in to dramatically boost the power and ease of using Excel.
What is ASAP Utilites?
I work in an Accounting/Finance area dealing with lots of reporting, so I have Microsoft Excel open all day long. One of the best things that I ever installed on my work machine is ASAP Utilities. This powerful Excel add-in allows you to do complex, advanced tasks quickly and efficiently. It also allows you to do some very handy things that Excel doesn’t even do out of the box.
How Much Does it Cost?
There are two versions: the FREE one which is really for personal use and the $50 version which is for professional use (at work). Aside from the personal/professional rules, they are almost identical.
How Does ASAP Work?
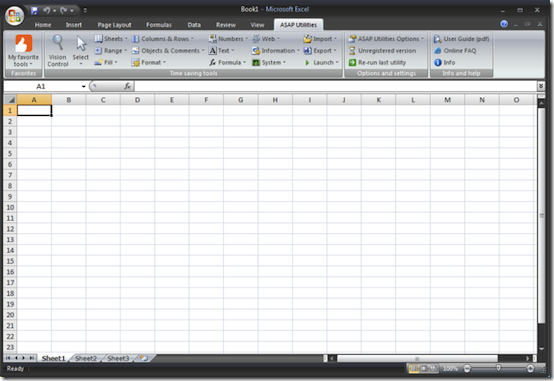
ASAP Utilities installs itself as an Add-In which creates an ASAP Utilities tab on Excel’s ribbon.
All of the operations that ASAP performs are grouped into categories represented by dropdown lists on its ribbon tab.
Some of the features that I used most are under the Sheets, Range, Numbers, Text, and Import categories.
Greatest Hits
Among the numerous features that I use, my favorites are:
Advanced Character Find and Replace – great for removing carriage returns in text.
Copy (formula generated) Data as Values – paste the actual numbers anywhere.
Find and Clear Duplicate Values – great for getting one of each value in a big table.
Color Every Nth Column/Row – get striped rows without making a table.
Delete Leading or Trailing Characters – Strip area codes or middle initials off a list in seconds.
There is even a Favorites option where you can save your most frequently used commands.
These are very useful, but two that I use A LOT are under the Import and Sheets categories. I regularly have to produce a report that pulls data out of 10 – 20 separate Excel files. The data is the same, just for different business groups. I need to get all of this data into one file, then onto one worksheet.
Here’s how I do it:
Us the Merge and/or Import Multiple Files command under the Import category to grab the data from all of my files and pull it into a new workbook. Each file creates a tab named after the original file name.
Opening 15 files, copying their data, and pasting it into a new workbook would take a LOOONG time and be very prone to screw-ups.
Now that I have all of the data in separate tabs in the same workbook, I need to get all of the data onto the same worksheet. I select all of the worksheets (tabs) and run the Put together rows/columns from separate sheets command under the Sheets category. This places a copy of all of the data on my 15 tabs into a brand new tab. Voila! Now I can sort, subtotal, and analyze everything at once. This takes me about three minutes depending on the number and size of the files. Try doing that as a copy and paste job in less than 20!
See it in Action
The following video shows how to combine data from 15 separate Excel files into one worksheet in a new file.
Some Other Weird but Cool Options
There are more commands/features than I care to count. Most people will probably stick to a few core features, but here are a few obscure ones that I like:
Bulk Create Folders – type a bunch of folder names in cells and it will create them on your hard drive.
Text Case – Convert hundreds of rows of text to UPPERCASE, lowercase, or Title Case.
List All Fonts in a New Workbook – List every font on your machine and display every character in that font. Pretty handy for typesetting.
Find and Remove All Links – Strips html links from data that you pasted from the internet.
What are you Waiting For, Go Get It
Head on over to http://asap-utilities to get yourself a FREE copy of ASAP Utilities. You will be the new Excel Guru in your office.
Did you Like this Article?
Why not get free updates from VitaminCM.com?

Or just  Follow me on Twitter, where I am constantly sharing great articles written by people WAY smarter than me. Or, see some of the other places where you can connect with me out there in the wilds of the internets.
52 Time Saving Windows Tips

If you want to work faster and more efficiently on your PC you really need to leverage the shortcut keys that
If you want to make Windows a super-efficient productivity machine, you really need to make use of it’s built in shortcuts. Learning just a few simple keystrokes can help you get everything done quicker and easier than you may imagine. Here is a list compilation of over 50 shortcuts, tips, commands, and more that will dramatically improve your computing experience.
The Control Key
![]()
![]()
The Control key is your most powerful ally. Ctrl + some keys will allow you to quickly perform the most important, useful operations on your computer.
CTRL + A = Select All
CTRL + B = Bold selected content
CTRL + C = Copy selected content
CTRL + V = Paste copied content
CTRL + X = Cut selected content
CTRL + P = Print
CTRL + N = Create a New File
CTRL + S = Save
CTRL + Z = Edit> Undo
CTRL + I = Italicize selected content
CTRL + E = Center selected content (only some apps)
CTRL + Q = Quit active program
CTRL + U = Underline selected content
CTRL + O = Open a file in the active application
CTRL + R = Refresh browser
CTRL + G = Group selected items into one
CTRL + T = Open a new Browser tab
CTRL + HOME = Top of a document or page
CTRL + END = Bottom of a document or page
CTRL + SHIFT + ESCAPE = Open Task Manager
CTRL + SHIFT + S = Save As
The Windows Key

![]()
The Windows or Start key does some very useful tricks.
 + E = Opens Windows Exporer
 + D = Minimize or Restore all open application windows
 + L = Locks your computer (Same as Ctrl + Alt + Del, then Lock button)
 + R = Open Run command
 + F = Search Files on computer
 + U = Open Utility Manager
 + F1 = Help Menu
The Alt Key
![]()
![]()
The Alt key is infrequently used, but it has a few gems up its sleeve.
ALT + TAB = Toggle between running applications
ALT + “any letter” = Show quick tasks in menus and toolbars (ALT + F opens the File Menu)
The Function Keys
F1 = Help Menu
F2 = Rename File / Folder
F4 = Repeat last formatting option in Office
F5 = Refresh Browser
F11 = Hide/Restore Browser toolbars
F12 = Print
Windows Explorer Tips
Make shortcuts to your frequently used folders and files
Place shortcuts to your frequently used folders in the Favorites folder (C> Windows>Favorites)
Quickly jump to your favorite
Drag files from Explorer to a document, email, etc.
Drag file attachments from an email or browser to a folder in Explorer
Keep two Explorer Windows open and drag and drop files between folders
Microsoft Office
F4 = Apply the last formatting command
CTRL + Z = Undo last action
CTRL + Y = Redo the action that was Undone
Right click on text to show formatting options. (Office 2007 & 2010)
Internet and Browser Shortcuts
These shortcuts will work in any browser on Windows.
Backspace = Go to the previous page
ALT + ![]() = Go to the previous page
= Go to the previous page
ALT + ![]() = Go Forward a page
= Go Forward a page
F5 Key = Refresh Browser
CTRL + R = Refresh Browser
CTRL + T = Open a new Browser tab
CTRL + Click a link = Open link in a new tab
SHIFT + Click a link = Open link in new Browser window
F11 = Hide/Restore Browser toolbars/menus
Right Click to copy or save an image
Scroll Wheel Click on a link to open it in another tab
Scroll Wheel Click on a tab to close the tab
Drag a tab out of the window to open that tab in its own window
Drag a tab from one browser to another to open the page in a different Browser
Right Click Options
Right Click ![]()
If you are in ANY application and are looking for a quick way to get something done, try the Right Click trick. Right clicking usually opens up a menu with several convenient options in most software. This is a lifesaver lots of times.
When in doubt, Right Click!
More Resources
Here are a few great places to find even more handy tips.
How to navigate Windows using a keyboard
Save time with quick computer shortcuts
Mac Keyboard Shortcuts
If you’re using a Mac, there is a similar collection of incredibly useful shortcuts to help you out. Try some of these.
Reference for EVERY Character Key on a Mac
Did you Like this Article?
Why not get free updates from VitaminCM.com?

Or just  Follow me on Twitter, where I am constantly sharing great articles written by people WAY smarter than me. Or, see some of the other places where you can connect with me out there in the wilds of the internets.


 Subscribe via RSS Reader
 Subscribe via YouTube